The same epoxy product, applied by the same crew, can bond for ten years on one job and peel within weeks on another. The difference usually isn't the epoxy. It's what happened to the surface before the roller ever touched it.
This guide walks through the exact prep sequence: what to inspect, what to clean, how to profile the surface, and which environmental checks you can't skip. We'll also cover the variables that quietly determine whether your recoat holds or fails, and when a full strip-and-reapply beats a simple topcoat.
Key Takeaways
- Cleaning, profiling, and moisture testing cause most epoxy recoating failures.
- Amine blush and surface gloss block adhesion and must be abraded away before recoating.
- Skipping adhesion or moisture tests causes most peeling, blistering, and delamination complaints.
- Heavily degraded or contaminated coatings often need full removal rather than a quick recoat.
Step-by-Step Guide: How to Prepare Surfaces for Epoxy Recoating
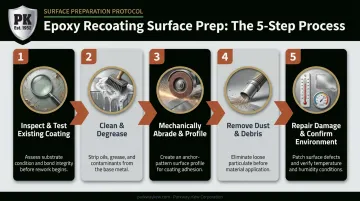
Follow these five steps in order. Skipping ahead (say, sanding before you've confirmed the old coating is even sound) is how avoidable failures happen.
Step 1: Inspect and Test the Existing Coating
Before you prep anything, confirm the existing coating is worth building on.
- Look for delamination, cracking, or chalking using a flashlight held at a low angle to catch surface irregularities daylight misses.
- Check for active moisture intrusion, especially on concrete slabs or metal tanks with a history of condensation issues.
- Run a tape adhesion test. Score an X into the coating, press adhesive tape firmly over it, then pull it back sharply. If the coating lifts cleanly, adhesion is failing. The ASTM D3359 tape test method is the standard reference for rating how well a film is bonded, using a comparative 0-5 scale rather than a pass/fail number.
Tools needed: moisture meter, adhesion test kit, flashlight, and a notepad to log problem areas before they disappear under sanding dust.
Step 2: Clean and Degrease the Surface
Oil, grease, and chemical residue sit on top of a coating and block anything applied over them from ever touching the actual surface.
- Use a degreaser or detergent matched to the contamination type (petroleum-based residues need a different approach than general grime).
- Rinse thoroughly. Leftover detergent film causes adhesion problems just as reliably as the original grease did.
- Allow complete drying before moving to abrasion. Sanding a damp surface just redistributes the contamination.
Ventilation matters here. Solvent-based cleaners release vapors that build up fast in enclosed tanks or low-ceiling industrial spaces, making PPE and proper airflow a compliance requirement in these environments.
Step 3: Mechanically Abrade and Profile the Surface
This is the step most premature recoat failures trace back to. A glossy, cured epoxy surface is smooth by design, which is precisely why a new coat can't grip it without help.
- Scuff-sand or screen the surface to knock down gloss and open up a mechanical profile.
- Remove amine blush , a hazy or waxy film that some epoxies develop during cure, particularly in cold or humid conditions. Left in place, it interferes with the next layer's bond.
- Match your abrasive to the coating build. Lighter sanding works for a standard recoat; heavier grit or screening is needed if the coating has aged or the recoat window has already passed.
Tools: orbital sander, floor buffer with a screen pad, or abrasive blasting equipment for thicker industrial coatings on metal substrates.
For heavy industrial equipment, precision matters even more than it does on smaller-scale projects. At Parkway-Kew, large-diameter grinding (up to 65 inches in diameter and 12 feet in length) establishes a consistent, even profile on wear parts like wire drawing blocks before any new coating goes on.
Uneven grinding creates high and low spots, and those translate directly into inconsistent bond strength across the part.
Step 4: Remove Dust and Debris
Sanding leaves behind fine dust that's easy to see and easier to miss in the corners.
- Vacuum the entire surface, not just the areas that look dusty.
- Wipe down with a tack cloth immediately before recoating to catch anything the vacuum left behind.
- Do this check right before you open the epoxy, not an hour before. Dust settles.
Step 5: Repair Damage and Confirm Environmental Conditions
Fill any chips, gouges, or cracks with an epoxy patching compound that's chemically compatible with your topcoat system. Let it cure fully before proceeding. Patch cure times vary widely by product: some cementitious repair mortars cure in about 6 hours at 73°F, while certain modified epoxy systems need 12-24 hours. Check the specific product data sheet rather than assuming a standard timeline.
Then check the environment:
- Ambient temperature within the manufacturer's stated application range
- Humidity below the product's maximum threshold
- Dew point: the substrate should sit several degrees above it, not just the surrounding air
Skip this step and you risk blush, poor cure, or a coating that never fully levels out.
Tools, Materials, and Conditions You Need Before Recoating
Having everything staged before you start prevents mid-job delays that leave a partially-prepped surface exposed to contamination overnight.
Equipment:
- Orbital sander, floor buffer, or abrasive blaster
- Wet/dry vacuum
- Moisture meter
- Adhesion test kit
Materials:
- Compatible degreaser matched to the contamination type
- Epoxy patching filler rated for your substrate
- Topcoat chemically matched to the original coating system
Mixing incompatible chemistries is a common cause of intercoat failure, so double-check compatibility before applying.
Readiness checks:
- Verified temperature and humidity within the product's application window
- Secured adequate ventilation, especially for enclosed spaces
- Selected PPE suited to the cleaning agents and abrasives in use
- Confirmed cure-time compliance if you're patching before recoating
Skipping any one of these doesn't guarantee failure. It just stacks the odds against you.
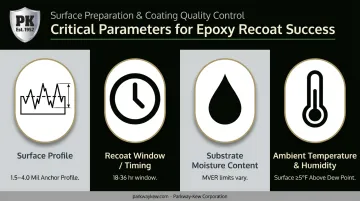
Key Parameters That Affect Epoxy Recoating Results
Recoat success comes down to measurable variables, not intuition. Here's what actually moves the needle.
Surface Profile (Roughness)
Mechanical bonding depends on the new epoxy having something to physically key into. A profile that's too shallow leaves the coating sitting on top of the surface rather than gripping it.
Precision-controlled surface prep, the kind used in industrial coating restoration, correlates directly with long-term adhesion. Parkway-Kew, which grinds and profiles industrial parts before applying wear-resistant coatings like HVOF and plasma spray, relies on this same principle: a consistent, uniform texture across the entire part beats an inconsistent, spot-treated surface every time.
Recoat Window / Timing
Every epoxy system has a window during which a fresh coat chemically bonds to the one below it. Miss that window, and only mechanical bonding (meaning sanding) will get you a solid bond.
Published windows vary widely by product. Sikafloor-161's technical data sheet lists a maximum recoat window of just 18-36 hours depending on temperature, while some other epoxy systems allow up to 72 hours before abrasion becomes mandatory. There's no universal rule here; check your specific product's data sheet every time.
Substrate Moisture Content
Trapped moisture vapor pushes against a new coating from underneath, regardless of how well the surface was cleaned or sanded. This is why moisture testing happens before prep work, not after.
Untested moisture is one of the most common causes of blistering months after application. Different products tolerate different moisture levels, too: some rate up to 15 lb MVER, while others cap out much lower, so there's no single "safe" number across all systems.
Ambient Temperature and Humidity During Application
Temperature and humidity control cure speed, pot life, and how the coating levels out.
Amine blush, that hazy, sometimes greasy film mentioned earlier, tends to show up specifically when temperatures run low or humidity runs high during cure. Outside the product's stated range, you can also end up with orange peel texture or a coating that stays tacky far longer than it should.
Common Mistakes and Troubleshooting Surface Prep Issues
Common Mistakes to Avoid
- Recoating over glossy, unsanded epoxy without any mechanical profiling
- Applying a recoat outside the manufacturer's window without abrading first
- Skipping moisture testing on concrete or metal substrates known for vapor transmission
Each of these mistakes is invisible at application time. They only show up weeks or months later, which is exactly why they're so easy to repeat on the next job.
Troubleshooting Guide
| Problem | Likely Cause | What to Check |
|---|---|---|
| Peeling or delamination | Inadequate surface profile or leftover contamination | Redo the adhesion test; inspect for missed degreasing spots |
| Bubbling or blistering | Trapped moisture or solvent off-gassing | Re-run the moisture meter test; confirm substrate dryness before the next attempt |
| Uneven gloss or amine blush | High humidity during cure or an incorrect mixing ratio | Review environmental logs; confirm the resin-to-hardener ratio matched spec |
If a problem shows up in one of these categories, resist the urge to just apply another coat over it. Diagnose first. A second coat over an unresolved moisture or contamination issue just delays the failure — it doesn't prevent it.
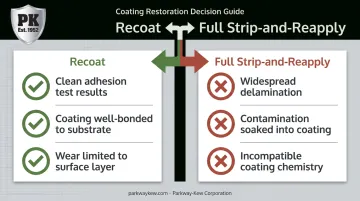
When to Recoat vs. Full Strip-and-Reapply
Recoating works best when the existing coating is largely intact, with wear limited to the surface layer. A recoat is usually the faster, more economical fix when:
- Step 1 tests come back clean
- The coating remains well-bonded to the substrate
- Wear hasn't penetrated past the surface layer
Full strip-and-reapply becomes the safer call when:
- Delamination is widespread rather than localized
- Chemical contamination has soaked into the coating itself, not just the surface
- The prior coating's chemistry is incompatible with what you're planning to apply
For heavy-wear industrial components, simple recoating sometimes can't keep pace with the wear pattern. Wire drawing blocks, for instance, tend to wear unevenly — the drawline groove wears far faster than the rest of the surface. A standard regrind approach forces you to grind the entire block down to the depth of that groove, removing coating that was still perfectly functional everywhere else.
Parkway-Kew's Restore & Grind process takes a different approach: it fills and blends only the worn drawline area, leaving the surrounding coating untouched. Parkway-Kew applies its coatings at an enhanced thickness from the start, so this targeted repair can be repeated 5 to 7 times before a full recoat is ever needed. That cuts both cost and downtime compared to treating the whole surface every cycle.
Getting this right starts with disciplined surface prep and respecting the recoat window's environmental limits. From there, it's a judgment call: know when targeted restoration beats a full strip-and-reapply, and you'll cut both cost and downtime on every job.
Frequently Asked Questions
What does recoating mean?
Recoating means applying a new layer of coating over an existing, still-functional coating rather than stripping it back to bare substrate. It relies on the old coating being clean, sound, and properly profiled.
Can you recoat powder coating?
Yes. You can recoat powder coating with liquid or powder systems once you scuff and clean the surface. The cured layer forms an electrical insulator, so it needs mechanical adhesion rather than an electrostatic bond.
What are the types of coatings?
Major categories include epoxy, polyurethane, powder coating, epoxy/polyaspartic hybrids, and thermal spray or HVOF coatings for metal substrates. Each suits different combinations of chemical resistance, wear resistance, and application environment.
What's the difference between painting and coating?
Paint is primarily decorative, with a thinner film built for appearance. Coatings provide protective performance (chemical resistance, wear resistance, or waterproofing) with thicker, more durable films.
How long should you wait before recoating epoxy?
Windows vary by product, ranging from roughly 18-36 hours to as much as 72 hours depending on temperature and the specific system. Always check the manufacturer's data sheet rather than assuming a standard timeframe.
Do you need to sand between coats of epoxy?
Yes, if you're outside the recoat window or the surface shows any gloss. Sanding creates the mechanical profile needed for the new layer to bond, since chemical bonding is no longer possible once the prior coat has fully cured.