Many manufacturers still rely on manual spot-checks that miss drift between samples. The result: scrap and rework, wasted material, inconsistent finishes, and application defects like sagging, poor atomization, and orange peel. One office-furniture coating operation cut those losses dramatically simply by switching from manual checks to continuous in-line viscosity measurement, saving $45,000 in the first year while using 10% less paint.
This guide covers viscosity fundamentals, why control matters, proven measurement practices, the tools available, and how to spot trouble before it reaches the applicator.
Key Takeaways
- Viscosity determines film thickness and solids concentration, making target accuracy critical to a usable product
- Shear rate and temperature affect measured viscosity, so testing must match actual process conditions
- In-line, closed-loop control beats manual spot-checks for accuracy and repeatability
- Target viscosity varies by application method: spray, brush, and roll coating each need different ranges
- Instrument choice, sensor placement, and test protocol matter as much as the number itself
Why Coating Viscosity Control Matters
Viscosity governs how much solid material lands on a substrate per pass. Too thin, and solids run off before the film builds properly. Too thick, and the coating won't level, leaving an uneven, unusable surface. This is why viscosity control connects directly to product quality, not just process convenience.
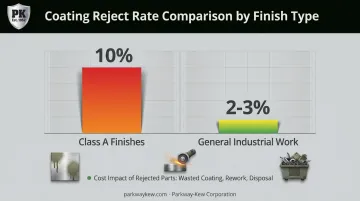
The cost math is unforgiving. Rejected finish work isn't rare:
- Class A finishes: around 10% reject rate
- General industrial work: 2-3% reject rate
Every rejected part means wasted coating, reworked labor, and disposal costs for scrapped material, according to industry benchmarking.
Batch-to-batch consistency also protects quality standards long before a customer ever sees the part. Manufacturers use viscosity data as an early warning system, catching drift before a bad batch ships.
There's a regulatory angle too. VOC compliance calculations (the kind the EPA ties to surface coating operations) are based on coating solids and volatile content per volume applied. Add solvent to fix viscosity on the fly, and you can inadvertently push a formulation outside its compliant VOC range. Thinner additions and application method need to be controlled together, not treated as separate problems.
Parkway-Kew Corporation has applied a similar discipline since 1952, though with molten alloy instead of liquid coating. The company pioneered submerged arc welding for hardsurfacing wire drawing blocks in the 1950s, a tightly parameter-driven deposition process.
That era produced two purpose-built alloys: PK-503, a super-hard alloy with an acceptable heat-checked surface, and PK-200, a chemically refined version engineered to deposit virtually crack-free when surface quality is critical.
The material differs, but the lesson doesn't: repeatable application control is what separates a durable finish from a costly failure.
Understanding Coating Viscosity Fundamentals
What Is Viscosity?
Viscosity is a fluid's internal resistance to flow. In rheological terms, it equals shear stress divided by shear rate. Standard units are centipoise (cP) or poise (P), where 1 cP equals 0.01 poise or 1 mPa·s.
Industry shorthand is simple: "thick" coatings have high viscosity and resist flow, while "thin" coatings have low viscosity and flow easily. Neither term is a specification on its own: a viscosity reading only means something when reported alongside temperature, instrument type, and shear rate. This distinction matters on spec sheets and QC logs, where a bare number without context creates confusion on the shop floor.
Shear Rate and Shear-Thinning Behavior
Most coatings are shear-thinning (pseudoplastic): viscosity measured at rest is far higher than viscosity during application. Shear stress, not shear rate alone, is what actually drives that drop, though most instruments display rate because that's what they control directly.
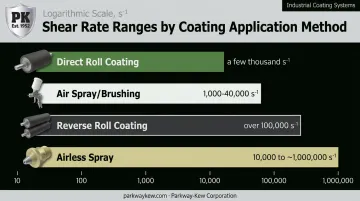
This matters because application methods operate at wildly different shear regimes:
| Application Method | Typical Shear Rate |
|---|---|
| Direct roll coating | A few thousand s⁻¹ |
| Air spray / brushing | 1,000–40,000 s⁻¹ |
| Reverse roll coating | Over 100,000 s⁻¹ |
| Airless spray | 10,000 up to ~1,000,000 s⁻¹ |
A low-shear lab reading might confirm batch consistency but tell you nothing about how that same coating atomizes at spray-gun shear levels. Reverse roll coating pushes viscosity into its steepest drop, often an order of magnitude below the static reading. Test at a shear rate that approximates the actual application.
Temperature's Effect on Viscosity
Shear rate isn't the only variable that matters. Temperature exerts just as much influence, moving viscosity in the opposite direction — warm coating flows more easily, cold coating resists flow. In an uncontrolled plant environment, that swing alone can push a batch out of spec even though nothing about the formulation changed.
This is why offline measurements taken on a shop floor without temperature compensation are unreliable. A cup reading taken at 65°F on a Monday morning won't match one taken at 95°F on a summer afternoon, even from the identical drum.
The fix requires building a product-specific temperature-viscosity curve and normalizing every reading to a reference temperature, rather than guessing at a correction factor.
Best Practices for Coating Viscosity Control
1. Implement closed-loop, in-line control. Position a viscosity sensor directly in the feed line to the applicator. This way, it measures the material actually being sprayed or rolled, not a sample pulled minutes earlier. Feed that signal into a PID controller that automatically doses make-up fluid or solvent to hold the target.
2. Use temperature-compensated measurement. Model the coating's temperature-viscosity relationship in advance and program it into the control electronics, so readings stay accurate regardless of ambient swings.
3. Standardize manual sampling when it's still used:
- Draw samples representative of material actually reaching the applicator
- Sample often enough to catch drift between checks
- Replicate in-line shear conditions in the lab whenever possible
- Prevent off-gassing before testing
- Keep technique identical across every operator and shift
4. Match target viscosity to the application method. Industry rule of thumb: roughly 100 cP at application-relevant high shear, within a workable range of 50-500 cP, depending on the equipment and coating type.
- Too thin (below ~50 cP): turbulence, fine overspray, sagging
- Too thick (above ~500 cP): poor atomization, gun spitting or cobwebbing, brush drag, ropy roll-coated finishes
5. Choose low-maintenance, self-cleaning sensors rated for the production environment, including hazardous-area options where solvents are present. Fewer moving parts mean less unplanned downtime.
6. Document and standardize test procedures (cup type, temperature stabilization time, stopwatch technique, cleaning steps) across every shift. Comparable measurements only mean something if the method never changes.
How to Measure and Monitor Coating Viscosity
Common Viscosity Measurement Tools
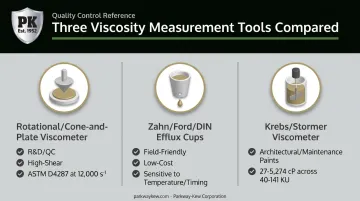
Different tools suit different stages of production:
| Instrument | Best Used For | Key Note |
|---|---|---|
| Rotational / cone-and-plate viscometer | R&D and QC, high-shear comparison | ASTM D4287 runs at 12,000 s⁻¹, close to real application shear |
| Zahn, Ford, or DIN efflux cups | Field-friendly floor checks | Low-cost but sensitive to cup number, temperature, and timing |
| Krebs/Stormer viscometer | Architectural and maintenance paints | Reports in Krebs Units, roughly 27-5,274 cP across a 40-141 KU range |
Cup seconds, Krebs Units, and cone-and-plate cP aren't interchangeable. Each reflects a different geometry and shear condition, so conversions between them are material-specific at best.
Signs Your Coating Viscosity Needs Adjustment
Even when instrumentation confirms in-spec viscosity, conditions on the floor can shift fast. Watch for these warning signs on the line:
- Poor atomization or a spray pattern that looks uneven
- Gun spitting or cobwebbing during application
- Sagging or running on vertical surfaces
- Orange peel or ropy texture on rolled coatings
- Brush drag or spatter
- Film thickness that varies noticeably across a single batch
Recommended Monitoring Frequency
Catching these signs early comes down to how often you check. Build monitoring into the routine:
- Check viscosity at the start of every batch or shift
- Re-check after any color, solvent, or temperature change
- Increase frequency in facilities with variable ambient temperature
- Use continuous in-line monitoring for high-volume or automated lines, where manual spot-checks simply can't keep pace
Conclusion
Viscosity control requires ongoing attention rather than a single setup step. Each application method, from brushing to airless spray, demands its own tailored approach. The combination that prevents scrap, rework, and inconsistent finishes is straightforward: the right measurement tool, matched to the right shear regime, backed by a temperature-compensated, standardized protocol.
Parkway-Kew Corporation has applied that same discipline to thermal-sprayed coatings for over 70 years. Its Restore & Grind process, for example, fills and blends only the worn drawline area of a wire drawing block instead of grinding down the entire part. This precision approach can be repeated 5 to 7 times before a full recoat is needed.
The company's in-house CNC machining and large-diameter grinding, handling parts up to 72 inches in diameter, exist specifically to hold coated surfaces to tight dimensional and concentricity requirements after application. Whether the material is a liquid coating or a thermally sprayed alloy, disciplined process control protects the finish long after the part leaves the shop floor.
Frequently Asked Questions
What is the viscosity of a coating?
Viscosity is a fluid's resistance to flow, measured in centipoise (cP). It directly determines how a coating levels, atomizes, and builds film thickness during application.
What is the 80/20 rule for coating?
In coatings, the 80/20 rule usually refers to Pareto-style defect analysis — identifying which coating layer or process step accounts for most defects so root causes can be prioritized. It isn't a standard dilution ratio or transfer-efficiency figure.
What is the ideal viscosity for spray painting?
Roughly 100 cP is the industry rule of thumb for high-shear applications like spraying, with an acceptable working range of about 50-500 cP depending on the paint and equipment used.
How does temperature affect coating viscosity?
Viscosity and temperature move inversely: warmer coating flows more easily, while cooler coating resists flow. In uncontrolled environments, this makes temperature-compensated measurement necessary for accurate, repeatable readings.
How often should coating viscosity be checked during production?
Check at the start of every batch or shift, and again after any formulation, color, or temperature change. High-volume or automated lines benefit from continuous in-line monitoring instead of periodic spot-checks.
What's the difference between viscosity and film thickness (build)?
Viscosity is a flow property that influences how a coating applies; film thickness (build) is the resulting depth of coating on the substrate. A "thick" viscosity reading doesn't automatically mean a thick film build.